By Michael Nielsen, Publisher | 15+ Years in Diesel Repair
Last Updated: September 2026
⏱ Estimated reading time: 15+ minutes
The clutch assembly in a commercial truck transfers every pound-foot of torque from engine to transmission, managing power delivery through thousands of engagement cycles under demanding conditions. Heavy duty truck clutch maintenance directly impacts the bottom line through reduced downtime, extended component life, and predictable operating cost. When clutches fail unexpectedly, trucks sit idle instead of generating revenue.
Professional fleet managers and owner-operators know that proactive clutch care delivers measurable returns — component lifespan extends significantly with proper inspection and adjustment procedure, while systematic maintenance catches a developing problem before it strands a driver roadside. Michael Nielsen and Heavy Duty Journal's editorial team built this guide to cover everything from understanding clutch system components to establishing inspection schedules that protect the investment mile after mile.
Key Takeaways
- ✓Inspection intervals vary by duty cycle: Line-haul fleets need checks every 25,000–30,000 miles while severe-duty applications require inspection every 8,000–15,000 miles.
- ✓Driver technique meaningfully impacts clutch life: Proper engagement technique reduces the slipping and heat that drive premature wear — the fleets with the longest clutch life consistently combine it with disciplined maintenance.
- ✓Recognize warning signs early: Slippage, unusual noises, pedal changes, and shifting difficulty indicate a developing problem that worsens rapidly without attention.
- ✓Self-adjusting clutches still need periodic inspection: Automatic wear compensation doesn't eliminate the need for visual assessment and condition monitoring.
- ✓Replacement economics favor scheduled timing: Perform clutch replacement during planned transmission work to avoid duplicating labor cost.
- ✓Proper tools enable accurate adjustment: Precision measurement instruments and manufacturer-specific tools ensure work meets specification.
In This Guide
- Understanding Heavy Duty Truck Clutch Systems
- Recognizing Signs of Commercial Truck Clutch Wear
- Essential Tools for Heavy Duty Clutch Maintenance
- Clutch Inspection Procedures
- Step-by-Step Clutch Adjustment Procedures
- Preventive Maintenance Best Practices
- Driver Practices That Extend Clutch Life
- Common Clutch Problems and Solutions
- When to Replace vs. Adjust Your Clutch
- Safety Protocols During Clutch Service
- Frequently Asked Questions
Understanding Heavy Duty Truck Clutch Systems
Commercial truck clutches function as complex power management systems designed specifically for rigorous hauling and frequent engagement cycles. These mechanical assemblies control the connection between engine output and transmission input, enabling smooth gear changes under substantial load. The clutch allows a driver to interrupt power flow temporarily without shutting down the engine — essential for managing heavy cargo across varying terrain.
The clutch's role extends beyond simple engagement and disengagement. It absorbs shock load during startup, protects transmission components from sudden torque spikes, and provides modulation for precise vehicle control. Understanding how each component contributes to this system helps maintenance professionals identify a potential issue before it escalates into costly failure.
Clutch Assembly Components
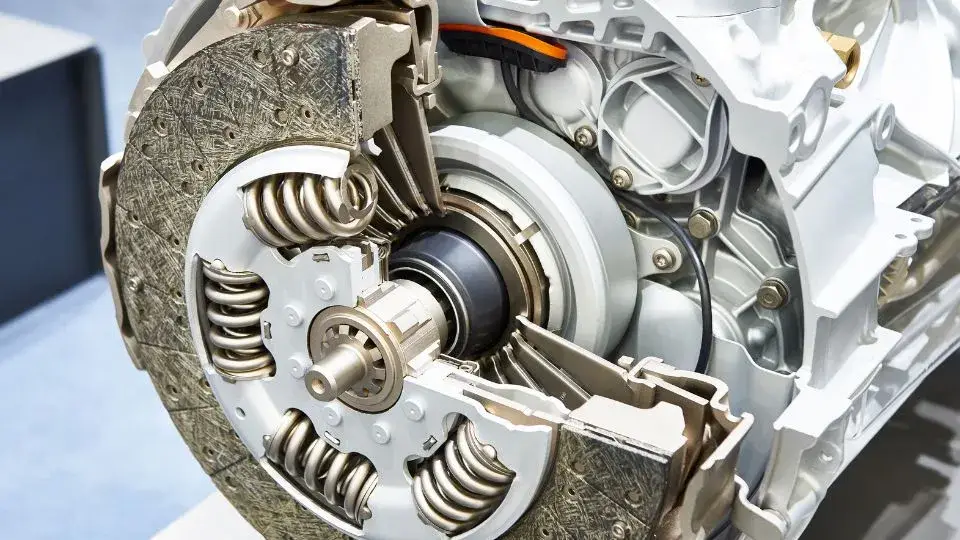
A complete clutch assembly consists of several integrated parts working in precise coordination. The clutch disc features friction material on both sides that grips against metal surfaces to transfer engine torque. This disc contains dampening springs that absorb torsional vibration and prevent drivetrain shock, with friction material engineered to withstand temperatures exceeding 500°F during normal operation.
The pressure plate applies clamping force to secure the clutch disc against the flywheel surface. Heavy duty versions generate between 2,500 and 4,000 pounds of clamping force depending on the application, with a diaphragm spring or coil springs maintaining consistent pressure as wear occurs over time.
Additional critical components include the flywheel, which provides the mounting surface and stores rotational energy from the engine crankshaft; the release bearing, which transfers pedal force to the pressure plate fingers while rotating with the assembly; the pilot bearing, which supports the transmission input shaft and maintains alignment with the crankshaft centerline; and the clutch fork, which converts linear pedal motion into the movement needed to activate the release bearing.
How Heavy Duty Clutches Differ from Light Vehicle Clutches
Heavy duty clutch systems incorporate substantially reinforced construction to handle commercial vehicle demands. The torque capacity difference between truck and passenger car clutches can exceed 400% in some applications, requiring larger-diameter assemblies with more robust materials throughout.
Commercial clutches use friction materials specifically formulated for high-temperature stability and extended service life. These organic or ceramic-metallic compounds resist glazing and maintain a consistent coefficient of friction across a wide temperature range, and the pressure plate design incorporates heavier castings with improved heat dissipation. Major heavy-duty clutch manufacturers engineer proprietary disc facing compounds and torque management systems specifically to protect high-value drivetrain components downstream.
| Characteristic | Light Vehicle Clutch | Heavy Duty Truck Clutch |
|---|---|---|
| Diameter Range | 8 to 11 inches | 14 to 15.5 inches |
| Torque Capacity | 150–300 lb-ft | 850–1,850 lb-ft |
| Clamping Force | 800–1,500 lbs | 2,500–4,000 lbs |
| Typical Service Life | 60,000–100,000 miles | 250,000–500,000 miles |
Common Clutch Types in Commercial Trucks
Manual clutch systems with mechanical linkage remain common in older truck models and some specialized applications, using a cable or series of rods to transfer pedal force directly to the clutch fork — simple and reliable, but requiring periodic adjustment as wear occurs.
Hydraulic clutch systems provide smoother operation and reduced pedal effort through fluid pressure multiplication. A master cylinder converts pedal movement into hydraulic pressure that activates a slave cylinder at the transmission, eliminating manual adjustment and accommodating longer distances between pedal and clutch assembly.
Self-adjusting clutches are the most advanced configuration for heavy duty applications, incorporating automatic wear compensation that maintains proper free play throughout the service life. Internal adjusters reset incrementally as friction material wears, eliminating manual adjustment while still requiring periodic inspection.
Clutch size selection depends on engine torque output and peak horsepower rating, transmission type and gear ratio spread, typical load weight and hauling profile, and duty cycle frequency and operating environment. A 14-inch clutch typically serves medium-duty applications with engines up to 350 horsepower; larger 15.5-inch configurations handle Class 8 trucks with 500-plus horsepower and torque exceeding 1,650 lb-ft.
Recognizing Signs of Commercial Truck Clutch Wear
Clutch problems rarely happen without warning — a truck communicates issues through distinct symptoms that demand immediate attention. Recognizing these indicators early saves money, minimizes downtime, and protects the entire drivetrain from secondary damage.
Warning Signs of Slipping Engagement
The most distinctive symptom of clutch slippage occurs when engine RPM increases without a corresponding increase in vehicle speed — most noticeable pulling heavy loads or climbing steep grades, when the engine races but the truck lacks the expected acceleration and pulling power.
Several factors cause slipping: worn friction material reducing gripping surface area, oil contamination from a leaking seal creating a slippery friction surface, weakened pressure plate springs failing to maintain adequate clamping force, improper adjustment preventing full engagement even with the pedal released, and overheating damage creating a glazed friction surface. A burning smell accompanying slippage indicates severe friction material damage from excessive heat during incomplete power transfer — immediate investigation becomes essential.
Unusual Sounds and Movement
Abnormal noise provides valuable diagnostic information about specific component failure. Grinding noise typically indicates a worn release bearing or damaged clutch components making metal-to-metal contact, occurring most frequently during pedal operation — continuing to operate accelerates wear and increases repair cost substantially.
Squealing suggests a problem with the release bearing or pilot bearing, often heard when the pedal is depressed or during engagement, caused by inadequate lubrication or bearing wear. Chattering presents as a stuttering or vibrating sensation during engagement, caused by contaminated friction surfaces, misaligned components, or damaged pressure plate springs — it becomes more pronounced under load and worsens without correction.
Changes in Pedal Operation
The clutch pedal is the primary interface with the clutch system, and changes in feel, travel distance, or resistance signal a developing problem. Excessive free play at the top of pedal travel indicates adjustment needs or worn linkage — normal free play typically measures one to two inches, and greater distance suggests adjustment or component replacement is needed.
A soft or spongy pedal in hydraulic systems points to air in the lines, reducing release effectiveness and making shifting difficult — bleeding the system and checking for leaks resolves most spongy pedal issues. Hard pedal effort suggests binding linkage, a damaged clutch fork, or a hydraulic problem, causing driver fatigue and indicating mechanical interference within the release mechanism. A pedal that stays on the floor after depression signals complete hydraulic failure or a broken linkage — a dangerous condition requiring immediate attention.
Essential Tools for Heavy Duty Clutch Maintenance
Hand Tools for Professional Clutch Work
Every clutch maintenance program starts with a solid foundation of hand tools — standard and metric socket sets from 8mm to 36mm handle most fastener requirements. Heavy duty applications demand six-point sockets rather than twelve-point designs to prevent rounded bolt heads under the substantial torque these components require.
Torque wrenches rated for heavy duty specification are non-negotiable — most clutch housing bolts require 50–150 ft-lbs of precise torque, and under-tightening causes failure while over-tightening cracks expensive housing. Clutch alignment tools deserve special mention, since they ensure proper disc installation during replacement.
Specialized Adjustment and Diagnostic Equipment
Free play gauges or precision rulers measure pedal travel to within 1/16 inch, ensuring adjustments fall within manufacturer tolerance. Feeler gauge sets check clearance between adjustment components, with most specifications calling for clearance between 0.010 and 0.050 inches.
Self-adjusting mechanisms often need manufacturer-specific reset tools to recalibrate after service — these vary by brand and model, making service manual consultation essential. Hydraulic pressure gauges connect to test ports to verify system operation, with most heavy duty hydraulic clutches operating between 150–250 PSI.
Dial indicators measure component runout and wear to 0.001 inches, helping determine whether a flywheel needs resurfacing, and electronic diagnostic scanners interface with transmission control modules on newer vehicles, monitoring engagement patterns and detecting electronic faults invisible to visual inspection. HDJ's Eaton Fuller transmission troubleshooting guide covers the driveline-vibration diagnostics that often get misattributed to the clutch.
| Tool Category | Primary Applications | Investment Level |
|---|---|---|
| Basic Hand Tools | Fastener removal, component positioning, general disassembly | $500–$1,500 |
| Clutch Adjustment Tools | Free play measurement, clearance checking, linkage adjustment | $200–$800 |
| Diagnostic Equipment | Pressure testing, wear measurement, temperature monitoring | $800–$3,000 |
| Hydraulic System Tools | Fluid line service, bleeding procedures, pressure testing | $150–$600 |
Clutch Inspection Procedures
Methodical inspection distinguishes professional fleet maintenance from reactive repair. Regular inspection establishes a baseline for system health and enables early detection of a developing issue. Federal regulation under 49 CFR Part 396 requires motor carriers to systematically inspect, repair, and maintain every commercial motor vehicle — and clutch components directly impact safe operation.
Visual Assessment Protocol
A thorough visual inspection reveals a problem before it causes system failure. Begin at the clutch housing and work systematically through each component. Look for a fluid leak around the master cylinder, slave cylinder, and every hydraulic connection. Inspect the housing for cracks, damage, or excessive heat — oil contamination on the exterior indicates seal failure needing immediate attention. Check all mounting hardware for proper torque and secure attachment, and examine linkage components for wear pattern, looseness, or corrosion.
The clutch fork deserves special attention, since a crack here leads to complete engagement failure. Inspect boots and seals for deterioration, tears, or missing sections exposing internal components to contamination. Document visual inspection findings with photos and notes to build maintenance history that tracks component degradation over time.
Measurement Techniques
Precise measurement separates proper adjustment from guesswork. Clutch pedal free play is the initial movement before resistance begins — measure this with a ruler alongside the pedal, pressing gently until engagement resistance is felt, and compare against manufacturer specification.
Free play measuring too small causes constant pressure on the release bearing, creating premature wear and potential failure. Excessive free play prevents complete engagement, leading to slippage and power loss. Record pedal height from the floor to the center of the pad, since a change here over time indicates wear in linkage or hydraulic components.
Hydraulic System Analysis
Hydraulic clutch systems need specific inspection focused on fluid condition and component integrity. Check the master cylinder reservoir level against the minimum fill line — a low level indicates leakage or normal system wear.
Examine fluid color and clarity — fresh clutch fluid appears clear or light amber, while dark, cloudy, or contaminated fluid requires complete system flushing and replacement, since moisture contamination reduces boiling point and causes a spongy pedal.
Test the slave cylinder for external leakage around the pushrod seal by pressing the pedal while observing the cylinder for seepage. Internal leakage shows as spongy pedal feel or gradual pedal descent under sustained pressure. Verify the correct fluid type fills the system per manufacturer specification, since improper fluid damages seals and creates system failure.
Step-by-Step Clutch Adjustment Procedures
Accurate adjustment separates professional fleet maintenance from guesswork, preventing costly downtime and premature wear. Cables and linkages controlling the clutch can slacken over time and need regular adjustment for correct operation.
Many technicians mistakenly believe tighter adjustment provides better performance, but proper specification-based adjustment strikes the balance between engagement and durability. A clutch that's too tight wears early and performs poorly, while excessive free play leads to incomplete disengagement and gear grinding.
Mechanical Linkage Adjustment
Rod-and-lever mechanical clutch systems remain common in many heavy-duty trucks for their simplicity and reliability. Locate the adjustment points, typically at the clutch fork or intermediate linkage connection. Park on level ground and set the parking brake before starting any work.
Measure current free play at the pedal — most heavy-duty trucks call for 1.5 to 2 inches, though always consult manufacturer specification. Loosen the locknut on the adjustment rod, then turn the adjustment nut clockwise to decrease free play or counterclockwise to increase it, checking pedal height and travel after each increment.
Verify the clutch fork moves freely without binding, then tighten the locknut to manufacturer-specified torque once proper adjustment is achieved. Check the adjustment under various conditions to confirm the linkage operates smoothly through its entire range without sticking or excessive resistance.
Self-Adjusting Clutch Calibration
Automatic wear-compensating clutches use internal mechanisms to maintain proper adjustment as the friction disc wears, reducing maintenance frequency but occasionally requiring manual intervention. A manual reset becomes necessary after component replacement or if the mechanism malfunctions — specific procedures vary by manufacturer, so consulting the service manual is critical. Common steps include removing the inspection cover to access the adjustment mechanism, locating the reset lever or adjustment wheel, manually resetting to initial position, and verifying the mechanism moves freely without binding.
⚠️ Safety Warning
Always verify that the self-adjusting mechanism operates correctly before returning the vehicle to service. Improper reset can result in sudden clutch failure or inability to disengage, creating serious safety hazards.
Hydraulic Clutch Bleeding
Hydraulic systems use fluid pressure to actuate the clutch, providing smooth operation and self-adjusting characteristics — but air trapped in the system, or a problem with either cylinder, causes inconsistent engagement. Bleeding removes trapped air, restoring proper pedal feel.
Fill the master cylinder reservoir with fresh DOT 3 or DOT 4 brake fluid per specification. Attach a clear plastic hose to the slave cylinder bleeder valve, with the other end in a container partially filled with clean fluid. Have an assistant pump the pedal several times and hold it down, open the bleeder valve to release air and fluid while the pedal is held, then close the valve before the assistant releases the pedal.
Repeat until no air bubbles appear in the discharged fluid, monitoring the reservoir level throughout — never let it run dry, which reintroduces air. After completing the procedure, verify proper pedal firmness and travel.
Free Diesel Maintenance Checklist
Get HDJ's free, field-tested diesel maintenance checklist delivered instantly to your inbox — print it, laminate it, keep it in the shop.
Instant PDF • 100% Free • No Spam
Preventive Maintenance Best Practices
A proactive approach to clutch care dramatically reduces downtime and extends component lifespan. The Technology & Maintenance Council has developed a large library of recommended practices for commercial vehicle maintenance, providing fleet managers with peer-reviewed technical guidance for building an effective maintenance program.
Recommended Maintenance Intervals
Establishing appropriate service intervals depends on operating environment and duty cycle. Line-haul operations typically need less frequent attention than severe-duty applications like construction or refuse hauling. HDJ's diesel engine maintenance schedule guide covers how clutch service fits into the broader fleet PM calendar.
| Application Type | Basic Inspection | Comprehensive Check |
|---|---|---|
| Line-Haul Operations | Every 25,000–30,000 miles | Every 50,000–75,000 miles |
| Regional Delivery | Every 15,000–20,000 miles | Every 40,000–60,000 miles |
| Construction/Refuse | Every 10,000–15,000 miles | Every 25,000–35,000 miles |
| Vocational/Severe-Duty | Every 8,000–12,000 miles | Every 20,000–30,000 miles |
Basic inspection includes visual checks and free play measurement, taking only 15–20 minutes. Comprehensive checks involve detailed linkage examination, hydraulic system inspection, and adjustment verification. Fleet managers should track clutch performance across different routes and drivers to refine inspection scheduling.
Lubrication Points and Environmental Protection
Proper lubrication keeps linkage components moving freely and prevents premature wear. Apply lubricant carefully to avoid contaminating friction surfaces — even small amounts of grease or oil on the clutch disc cause slipping and require component replacement.
Key lubrication points include linkage pivot points with lithium-based chassis grease at every major service interval, cable systems with light oil or specialized clutch cable lubricant every 20,000–30,000 miles, the clutch fork pivot and contact surfaces with high-temperature grease, and pedal assembly pivots with light grease for smooth pedal feel.
Protecting components from environmental contaminant extends service life significantly — dust, moisture, and oil leaks are the primary enemies of clutch longevity. Inspect all seals and boots regularly to ensure they remain intact and properly positioned. Address an oil leak from the engine or transmission immediately — even minor seepage can saturate friction material and cause slipping that requires complete replacement.
Driver Practices That Extend Clutch Life
Driver behavior is the single most controllable factor in extending clutch life. Even with rigorous maintenance schedules and proper adjustment, improper clutch operation can dramatically shorten component lifespan. The way a driver engages and disengages the clutch directly impacts heat generation, friction surface wear, and overall drivetrain stress — and there's a real, growing body of driver-coaching research indicating that behavior meaningfully affects wear across drivetrain components generally, not just the clutch.
Fleets that invest genuinely in driver training on proper engagement technique tend to see a real reduction in clutch replacement frequency — the exact size of that reduction depends heavily on the fleet's starting point and how consistently the training is reinforced, so treat any specific percentage with some caution rather than as a number a program can guarantee.
When operators understand the mechanical consequences of their actions, they naturally adopt habits that preserve equipment — every shift, start, and stop becomes an opportunity either to protect or damage the clutch assembly.
Smooth Engagement Methods
Mastering proper clutch technique starts with understanding the engagement cycle. The pedal should be depressed fully and smoothly when initiating a shift — rushing this motion or applying inconsistent pressure creates unnecessary wear on the release bearing and pressure plate.
After selecting the new gear, allow a brief moment for engine speed to stabilize before beginning engagement. This short stabilization period prevents drivetrain shock and reduces the speed differential the clutch must absorb. Release the pedal progressively rather than abruptly, coordinating throttle application to minimize slippage time.
Starting in the appropriate gear for load and grade is equally critical. Beginning in too high a gear forces extended clutch slippage to overcome the mechanical disadvantage — always select a starting gear that allows reasonably quick engagement without excessive engine RPM or clutch slip duration.
Destructive Habits to Eliminate
Several common driver errors accelerate clutch wear. Riding the clutch — resting a foot on the pedal during operation — creates constant release bearing load and partial disengagement, generating continuous heat and wear; keep the foot completely off the pedal except when shifting.
Using the clutch to hold on a grade instead of the brakes causes severe slippage and heat buildup — use the service brake to hold the vehicle stationary instead. Excessive slipping during starts burns friction material rapidly, so learn correct throttle-clutch coordination for the specific vehicle.
Downshifting without rev matching forces the clutch to absorb large speed differentials, creating shock loads throughout the drivetrain — match engine speed to the lower gear before engagement. Extended pedal depression at stops loads the release bearing unnecessarily; shift to neutral for a stop exceeding 30 seconds.
| Load Condition | Starting Gear | Common Mistake |
|---|---|---|
| Empty or light load | 2nd or 3rd gear | Starting too high, causing lug |
| Moderate load (50–75% capacity) | 2nd gear | Excessive slipping for smoothness |
| Heavy load (75–100% capacity) | 1st or Low gear | Starting too high, extended slip |
| Steep grade with heavy load | 1st or Low gear | Using clutch to hold position |
Common Clutch Problems and Solutions
Clutch Chatter and Vibration
Clutch chatter shows as noticeable vibration or shuddering when engaging from a complete stop — an uncomfortable jerking motion felt throughout the cab, typically most pronounced during initial engagement.
Contaminated clutch discs are the most common cause, from oil or grease reaching friction surfaces via a leaking seal or gasket. Glazed or hardened friction material develops from excessive heat exposure, creating an inconsistent grip. Solutions start with identifying and repairing an oil leak before it contaminates friction surfaces, replacing contaminated components completely since cleaning rarely restores proper function, and verifying alignment between engine and transmission during installation.
Incomplete Disengagement (Clutch Drag)
Clutch drag describes the clutch failing to disengage fully when the pedal is fully depressed, creating difficult or impossible gear engagement, grinding during shifting, and the vehicle creeping forward in gear despite the clutch supposedly being disengaged.
Insufficient pedal travel or improper free play prevents the release mechanism from fully separating the pressure plate from the disc. Air trapped in a hydraulic system creates a spongy pedal and reduces effective travel. A warped disc maintains contact with the flywheel or pressure plate even when released. Solutions include proper adjustment to achieve full disengagement travel per manufacturer specification, bleeding the hydraulic system completely to remove trapped air, and replacing a warped or damaged disc showing visible deformation or heat damage.
Premature Wear Factors
Understanding what accelerates deterioration helps maintenance teams implement prevention. Overloading beyond vehicle GVWR places excessive stress on the clutch with every engagement. Excessive slipping during engagement generates heat that degrades friction material rapidly. Riding the pedal maintains partial engagement, creating constant friction and heat buildup.
Addressing premature wear requires combining proper operation, load management, and leak repair — implement driver training emphasizing correct engagement technique, and establish load monitoring to keep vehicles within design specification.
When to Replace vs. Adjust Your Clutch
Assessing Component Condition
Accurate evaluation starts with measuring friction material thickness on the clutch disc — replacement becomes necessary when material wears to within 0.020 to 0.030 inches above the rivet heads, beyond which continued operation risks rivet contact with the flywheel and severe damage.
The pressure plate friction surface needs thorough inspection for heat checking, cracks, hot spots, or excessive wear — conditions indicating thermal stress that compromises the plate's ability to maintain proper clamping force. Pilot bearing wear often goes unnoticed until it causes a serious problem — include it in every inspection.
Key Recommendation
When transmission removal is already scheduled for other repair, clutch replacement becomes much more cost-effective even if components aren't at end of life. Labor represents 60–70% of clutch replacement cost, so addressing a borderline component during planned transmission work prevents future labor duplication. Per ATRI's operational costs research, repair and maintenance expense continues to represent a significant portion of per-mile operating cost for commercial fleets.
OEM vs. Aftermarket Components
OEM clutch parts provide guaranteed compatibility and proven performance in the specific truck model, meeting exact manufacturer specification and including warranty coverage that protects the investment. Quality aftermarket options frequently come from the same manufacturers who produce OEM components, offering potential cost savings while maintaining comparable performance.
When selecting between options, base the decision on application severity rather than initial purchase price alone. Severe-duty operations benefit from premium components that withstand extreme conditions; moderate-duty applications may perform well with quality mid-range alternatives that balance cost and durability. During any clutch replacement, consider resurfacing the flywheel to ensure smooth, even contact with new components.
Safety Protocols During Clutch Service
Working on heavy duty truck clutches involves significant hazards demanding strict adherence to safety procedure. OSHA's guidance on vehicle maintenance governs the safety of workers performing vehicle maintenance activity in terminal operations and fleet shops. Clutch components weigh hundreds of pounds and operate under extreme pressure and heat.
⚠️ Safety Warning
Hydraulic fluid under pressure can penetrate skin, causing serious injection injuries that may lead to amputation if not treated immediately. Always depressurize hydraulic systems completely before disconnecting any lines or components. Never use hands or fingers to check for hydraulic leaks.
Every technician must wear appropriate protective gear before beginning any service work. Safety glasses or a face shield protect eyes from flying debris, metal particles, and chemical splash. Steel-toed safety boots protect feet from a dropped component that can weigh 50 to 150 pounds or more. Heavy-duty work gloves provide hand protection when handling rough or sharp components, though remove them when working near rotating parts to prevent entanglement.
Proper vehicle securing prevents a catastrophic accident before any clutch work begins. Always park on level, stable ground and apply the parking brake firmly. Wheel chocks must be placed on both sides of at least two wheels. Jack stands rated for the vehicle's weight provide the only acceptable support system for an elevated truck — never work under a vehicle supported solely by hydraulic jacks.
Lockout-tagout procedures prevent accidental vehicle starting during maintenance. Disconnect both battery terminals and remove the key from the ignition, then attach a clearly visible lockout tag indicating maintenance in progress, the date, and the technician's name.
Frequently Asked Questions
How often should heavy duty truck clutches be inspected?
It depends on duty cycle. Line-haul operations should run basic inspection every 25,000–30,000 miles with comprehensive checks at 50,000–75,000 miles. Regional delivery needs inspection every 15,000–20,000 miles. Severe-duty applications like construction or refuse hauling need checks every 8,000–15,000 miles given frequent engagement cycles and higher heat generation. Basic inspection takes 15–20 minutes and includes visual checks, pedal free play measurement, and linkage condition assessment.
What are the signs of a failing commercial truck clutch?
Slippage where engine RPM increases without corresponding vehicle acceleration, especially under load or on grades. Grinding or squealing during pedal operation indicating a worn release or pilot bearing. Chatter presenting as vibration during engagement. A change in pedal feel — excessive free play, spongy response in hydraulic systems, or hard pedal effort. Difficulty shifting or gears grinding despite proper technique, indicating incomplete disengagement needing immediate attention.
How long do heavy duty truck clutches last?
Typically 250,000–500,000 miles under normal conditions, versus 60,000–100,000 miles for light vehicle clutches. Actual service life varies significantly with driver technique, load profile, and operating environment — severe-duty applications with frequent starts, heavy loads, and stop-and-go operation may see clutch life closer to 150,000–250,000 miles. Genuine driver training on smooth engagement technique meaningfully extends clutch life, though the exact gain depends on the fleet's starting point.
What causes premature clutch wear in commercial trucks?
The most controllable factor is driver habit — riding the pedal, using the clutch to hold on a grade instead of the brakes, excessive slipping during starts, and dumping the clutch abruptly. Mechanical issues include oil contamination from a leaking seal, overloading beyond GVWR specification, inadequate cooling, and drivetrain misalignment. Environmental factors like frequent stop-and-go operation, extreme temperature, and dusty conditions also accelerate wear.
When should you replace versus adjust a truck clutch?
Adjust when pedal free play is out of specification but component wear is otherwise acceptable. Replace when friction material measures within 0.020–0.030 inches above the rivet heads, when oil contamination has reached friction surfaces, when heat damage has caused disc warping or pressure plate hot spots, or when a broken spring or cracked component is present. Weigh replacement economics when transmission removal is already scheduled for other repair, since labor represents 60–70% of clutch replacement cost.
Maintaining Clutch Performance for Long-Term Reliability
Heavy duty truck clutch maintenance directly impacts fleet profitability through reduced downtime, extended component life, and predictable operating cost. The combination of systematic inspection schedules, proper adjustment technique, and driver training creates a comprehensive approach that protects the investment mile after mile.
Regular inspection catches problems early, proper adjustment technique maintains optimal performance, and driver education prevents the operational abuse that accelerates wear. When a component does reach end of life, an informed replacement decision balances immediate cost against long-term reliability — the same discipline Michael Nielsen and Heavy Duty Journal's editorial team hold every guide on heavydutyjournal.com to.
Share This Guide With Your Team
Know a fleet manager, shop foreman, or owner-operator who could benefit from these clutch maintenance insights? Help them reduce downtime and extend component life.