
By Michael Nielsen, Editor & Publisher | 15+ Years in Diesel Repair
Last Updated: April 2026
📖 Estimated reading time: 19 minutes
A diesel engine rebuild is not the kind of job that forgives a missing tool halfway through. Whether you’re doing an in-frame overhaul on a Cummins X15 with a million miles on the odometer or pulling a Detroit DD15 out of the frame for a full bottom-end inspection, your diesel engine rebuild tools determine just as much as your technique. The wrong tool at the wrong moment — a slip with a ring compressor, an uncalibrated torque wrench on head bolts, or a missed liner height measurement — can take a job that should have added 500,000 miles to the engine and turn it into a warranty nightmare before the truck leaves the shop.
This guide cuts through the noise. Instead of listing every socket and screwdriver a tech might own, we’ve organized the tooling you actually need by phase: teardown, measurement and inspection, machine shop handoff, assembly, and first start. We cover in-frame versus out-of-frame tool requirements, OEM-specific tooling decisions, and how to build a smart investment strategy around which tools to own versus rent.
Key Takeaways
- Scope drives your tool list: In-frame and out-of-frame rebuilds require fundamentally different setups — especially for lifting, support, and crankshaft access.
- Measurement tools are non-negotiable: A bore gauge, micrometer set, and dial indicator are required for any rebuild that expects to last — not optional upgrades.
- Modern engines require angle torquing: Virtually every heavy-duty diesel produced in the last 20 years specifies torque-plus-angle fastening for critical fasteners; a standard torque wrench is not enough.
- OEM specialty tools exist for a reason: Certain procedures on Class 8 engines — liner installation, injector service, timing — cannot be done correctly without OEM or OEM-equivalent fixtures.
- First-start verification needs its own toolkit: Pressure testing and diagnostic monitoring equipment are as important after assembly as the rebuild tools themselves.
In-Frame vs. Out-of-Frame: How Scope Determines Your Tool List
Before you pull a single bolt, the most important decision in a diesel engine rebuild is whether you’re doing an in-frame overhaul or a full out-of-frame engine removal. This isn’t just a labor question — it fundamentally changes which tools you need, which procedures are accessible, and which items you’ll need to outsource to a machine shop.
An in-frame rebuild leaves the block mounted in the chassis. The pistons, rings, cylinder liners, and sometimes the cylinder head are replaced without removing the engine from the truck. It’s commonly done as preventive maintenance on high-mileage commercial engines showing blowby, declining compression, or increasing oil consumption. Because the crankshaft remains in the block and the block itself stays in the frame, an in-frame job limits your access and your tool options. You’ll use specialized in-frame cylinder honing equipment, in-situ measuring tools adapted for vertical access, and liner pullers that can operate within the confines of the engine bay. You do not need an engine hoist or a full engine stand for an in-frame, but you will need a way to support the cylinder head during removal.
An out-of-frame overhaul is a complete disassembly: the engine is removed from the chassis, mounted on a stand, and torn down to the bare block. This allows access to the crankshaft, main bearings, camshaft, and all mating surfaces. It’s required when there’s a bottom-end failure, significant bearing damage, crankshaft wear beyond tolerance, or when the engine has suffered catastrophic internal damage. Out-of-frame work requires significantly more infrastructure — a heavy-duty engine hoist, a stand rated for the engine’s full weight, and a much broader set of precision measurement instruments.
Knowing which job you’re doing before you start shopping or renting tools prevents expensive surprises. The sections below are organized to cover both scenarios, with callouts where the tool requirements diverge.
Phase 1 — Teardown Tools: Breaking It Down Without Breaking Things
Teardown on a heavy-duty diesel engine is not a demolition exercise. Diesel engines are built to survive extreme compression ratios and operating loads, which means many components are interference-fit, thermally bonded, or torqued to specifications that require deliberate force to release. The wrong approach during disassembly causes damage that complicates inspection, mandates extra parts, and adds cost before you’ve even assessed the engine’s real condition.
Lifting, Support, and Positioning Equipment
For out-of-frame work, your first tool is your engine hoist. A Class 8 diesel engine — whether a Cummins X15, Detroit DD15, PACCAR MX-13, or Volvo D13 — typically weighs between 2,800 and 3,500 pounds bare, before accessories. Your hoist must be rated for the load with an appropriate safety factor. OSHA 1910.179 governs overhead hoist and crane operation in commercial shop environments, including load rating requirements, inspection intervals, and operator qualifications. Even a shop floor engine hoist must be inspected before each use and operated within its rated capacity — overloading a hoist with an engine this heavy is a life-safety issue, not just an equipment concern.
Equally important is your engine stand. Standard automotive engine stands rated for 1,000 to 1,500 pounds are not appropriate for Class 8 powerplants. You need a heavy-duty engine stand with a rated capacity of at least 4,000 pounds, with a rotating mount that allows you to flip the block for crankshaft and oil pan access. Confirm the stand’s mounting pattern is compatible with your engine family before the block comes out of the truck — adapters exist for most major engine families but must be verified in advance.
For in-frame work, a heavy-duty engine support bar across the chassis rails holds the cylinder head during removal and replacement without requiring full engine extraction. Adjustable engine support systems with chain attachments can stabilize the engine block while you work on the front and rear seals without removing the engine from the mount.
⚠️ Safety Warning
Never work beneath a suspended engine or a block supported only by a hydraulic jack. Heavy-duty diesel engines weigh over a ton. Use jack stands or a rated engine stand at all times when working under or around the suspended or partially supported engine. Inspect all chains, hooks, and load-bearing hardware before each lift.
Disassembly Hand Tools
The foundation of any teardown is a comprehensive socket and wrench set covering both SAE and metric in 3/8″, 1/2″, and 3/4″ drives, with deep-well and standard variants. Heavy-duty diesel fasteners routinely run from 10mm through 36mm and 3/8″ through 1-1/4″ SAE, so a complete range is not optional. Impact wrenches — both electric and pneumatic — are essential for breaking loose high-torque fasteners at teardown speed, but should never be used during assembly where torque control is required.
A quality set of snap-ring pliers (internal and external), a set of pry bars in multiple lengths, and a hammer set (dead-blow, brass, and standard) round out the basic teardown kit. For stubborn fasteners on exhaust manifolds and turbocharger connections — where corrosion and heat cycles can essentially weld hardware in place — penetrating oil, a torch, and an impact-capable crow’s foot set are often necessary before anything else will move.
Specialty Pullers and Extractors
Generic automotive pullers are often inadequate for heavy-duty diesel teardown. The harmonic balancer and crankshaft damper on a Class 8 engine require a heavy-duty puller rated for the interference fit and mass involved — not the light-duty 3-jaw puller from an automotive parts store. A dedicated camshaft puller prevents damage to the cam bearings and block bores during cam removal, which becomes critical if you plan to reuse the block.
Cylinder liner pullers are essential for both in-frame and out-of-frame work on wet-sleeve engines, which include most Cummins, Caterpillar, and older Detroit Diesel designs. These tools pull the liner out of the block bore without hammering or prying — methods that damage sealing surfaces and distort the block. Per Cummins service documentation, liner installation height measurement and controlled removal are required procedures on ISX and X15 engines to preserve block integrity across rebuilds.
Fuel injector pullers deserve their own mention. Modern common-rail injectors on engines like the Cummins X15 and Detroit DD15 are high-precision components that can be damaged if removed with improvised tools. Carbon buildup and heat can make them extremely difficult to extract, and the proper puller prevents the kind of sleeve thread damage that turns a $600 injector replacement into a $3,000 sleeve repair. Per Detroit Diesel service documentation, the DD15 and DD16 require a dedicated injector removal tool that supports the injector bore during extraction.
Phase 2 — Precision Measurement Tools: The Numbers That Matter
If teardown is about safely disassembling the engine, inspection and measurement is where you find out what the rebuild actually needs. Every go/no-go decision — whether to reuse a crankshaft, replace cylinder liners, or send a head to the machine shop — depends on measurements taken with calibrated precision instruments. Skipping or shortcutting this phase is the leading cause of rebuilt engines that fail prematurely.
Bore Gauges and Cylinder Measurement
A dial bore gauge is the primary tool for measuring cylinder bore diameter, taper, and out-of-round condition. Heavy-duty diesel cylinders are machined to extremely tight tolerances, and even minor taper or ovality — often imperceptible by eye or by feel — determines whether a liner can be reused, honed to accept oversized rings, or must be replaced entirely. Bore gauges used for Class 8 engine cylinders typically need to measure from 4.0″ to 5.5″ depending on the engine family, and must be accurate to 0.0001″ to be useful for rebuild decisions.
Telescoping (snap) gauges are a simpler alternative for quick bore measurements and work in conjunction with an outside micrometer to read the captured dimension. They’re less precise than a dial bore gauge in the hands of less experienced users but are a practical tool for field assessments before committing to a full overhaul.
Micrometer Sets for Critical Clearances
A complete outside micrometer set is indispensable for heavy-duty diesel rebuilds. You’ll measure crankshaft journal diameters, piston skirt diameters, valve stem diameters, and connecting rod pin dimensions — all to confirm they’re within OEM specification. Because each micrometer covers a one-inch measurement range, rebuilding a Class 8 engine requires at minimum a set covering 1″ through 5″ in one-inch increments. Digital micrometers with 0.00005″ resolution are preferred for rebuild work; analog tools with 0.0001″ resolution are acceptable but require more care in reading.
A digital caliper — while not a substitute for micrometers on critical measurements — provides fast general measurement capability for checking component dimensions, clearances, and lengths where micrometer-level precision is not required.
Dial Indicators, Feeler Gauges, and Plastigauge
A magnetic base dial indicator is the workhorse tool for checking crankshaft runout, end play, camshaft runout, gear backlash, and valve stem height. These tools read in increments of 0.001″ or finer and are used at multiple stages of both teardown assessment and final assembly verification. A good dial indicator setup with a flexible arm and magnetic base is used more often in a diesel rebuild than almost any other single measurement tool.
Feeler gauges — flat and wire — measure clearances between components: piston ring end gaps, valve-to-seat clearances, connecting rod side clearance, and crankshaft thrust bearing clearance. Per TMC Recommended Maintenance Practices, verifying ring end gap clearance before installation is a required step in commercial diesel engine overhaul to prevent ring butting and cylinder damage during the engine’s break-in period.
Plastigauge — a compressible wax strip that measures bearing oil clearance by crush width — is a quick method for checking main and connecting rod bearing clearances during assembly. While experienced engine builders use outside micrometers and bore gauges for definitive bearing clearance measurements, Plastigauge provides a practical confirmation step during assembly that can catch out-of-spec clearances before the engine is fully buttoned up.
0.001″
The maximum allowable crankshaft journal taper on most heavy-duty diesel engines before regrinding is required — a dimension impossible to assess without precision measuring instruments.
Phase 3 — The Machine Shop Question: What You Need Before and After
No matter how well-equipped your shop is, a diesel engine rebuild nearly always involves machine shop work. Block decking, cylinder honing, crankshaft grinding, line boring, and valve seat cutting require equipment that exceeds the investment practical for most diesel repair shops. Understanding where the machine shop handoff happens — and what documentation and measurements you need to provide — is part of the rebuild process that affects your tool selection.
Before the block goes to the machine shop, you need your precision measurements completed and documented. The machine shop needs your cylinder bore measurements, crankshaft journal measurements, deck flatness assessment (measured with a precision straightedge and feeler gauges across multiple diagonals of the block deck), and any liner height measurements relevant to your engine family. Arriving at the machine shop without this data results in additional charges for their time to measure what you should have already documented.
After the machine shop returns the block, you verify their work before assembly. Cylinder bore measurements confirm the hone is within the new specification. Deck flatness is re-checked. Crankshaft journal diameters are verified to confirm the grind matches the undersized bearing shells you’ve ordered. This second-pass measurement is not a distrust of the machine shop — it’s professional practice that catches errors before an assembled engine comes back apart.
Understanding where your measurements fall relative to OEM specifications helps you make informed decisions about which components to recondition versus replace outright — decisions that directly affect the rebuilt engine’s service life and its ability to meet original emissions certification requirements.
Rebuild Right the First Time
Get technical guides, torque spec references, and diesel engine maintenance content delivered to your inbox. Built for technicians who need the details, not the sales pitch.
Phase 4 — Assembly Tools: Where Precision Pays Off
Assembly is where every measurement you took during inspection becomes reality. A rebuilt heavy-duty diesel engine that runs for another 800,000 miles or fails inside a year is almost entirely determined by what happens during this phase. The tools in this section are not optional — they are the equipment that translates correct parts into correct clearances into a reliable engine.
Torque Wrenches and Angle Gauges
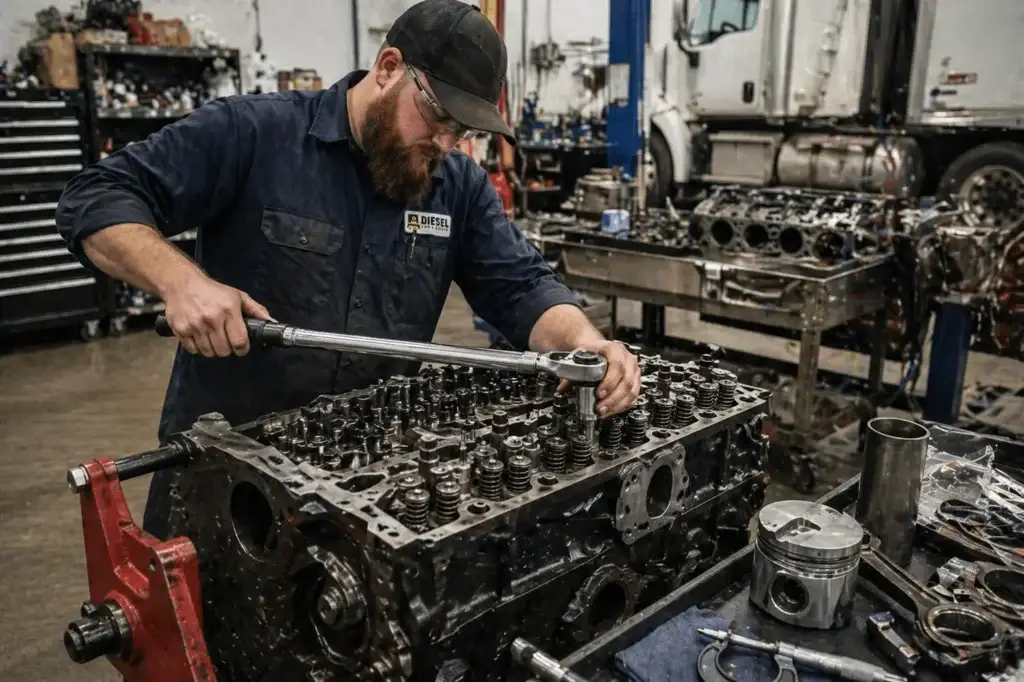
Every heavy-duty diesel rebuild requires at minimum a 3/8″ drive torque wrench (for smaller fasteners, valve train hardware, and sensor connections) and a 1/2″ drive torque wrench covering 20 to 150 ft-lbs for the mid-range fasteners that make up most of the assembly. Head bolts, main bearing cap bolts, and connecting rod bolts on Class 8 engines often require a 3/4″ drive torque wrench capable of reaching 300 to 500 ft-lbs or more. Per Cummins X15 service documentation, head bolts are torqued in multiple stages to specified values with angle-of-rotation specifications at the final stage. Per Detroit Diesel DD15 service procedures, main bearing cap bolts require a similar torque-plus-angle sequence.
A torque angle gauge — which attaches between the torque wrench and socket to measure degrees of rotation after the initial torque value is reached — is mandatory for any modern heavy-duty diesel engine overhaul. Alternatively, a digital torque wrench with integrated angle measurement performs both functions in a single tool. Annual calibration of all torque tools is strongly recommended; the cost of calibration is a fraction of the cost of a head gasket failure caused by an inaccurate reading.
⚠️ Safety Warning
Torque-to-yield (TTY) head bolts and connecting rod bolts — used on most modern heavy-duty diesel engines — are designed to be used once and replaced. Reusing TTY fasteners after removal compromises the clamping load and can result in head gasket failure under operating pressure. Always replace TTY fasteners during a rebuild; confirm with OEM service documentation which fasteners in your specific engine are TTY versus reusable.
Seal Drivers and Bearing Installation Tools
Front and rear crankshaft seals, camshaft seals, and valve stem seals must be installed flush and square to function correctly. Seal driver sets with interchangeable heads in multiple diameters allow controlled, damage-free installation — pounding a seal in with a hammer and drift results in distortion, lip damage, and an oil leak on first startup. A seal driver set that covers the range of seal diameters in your engine family is a basic assembly requirement.
Camshaft bearing installation tools use a driver shaft, guide, and correctly sized head to press cam bearings into their bores with proper alignment. Cam bearings installed off-center or at an angle restrict oil flow to the camshaft journals — a failure mode that often shows up at startup as low oil pressure at the top end, which is diagnosed only after the engine is already running. Per Volvo D13 service documentation, cam bearing oil hole alignment is a critical installation step that requires visual verification before the camshaft is installed.
Piston Ring Compressors and Installation Tools
A ring compressor is required to compress the piston rings into their grooves for installation into the cylinder bore. The wrong size compressor — or improvising with a hose clamp — risks breaking a ring, scoring the cylinder wall during installation, or damaging the piston skirt. For heavy-duty diesel engines, a band-style ring compressor adjustable to the piston diameter of your specific engine family is preferred over the ratchet-style plier compressors designed for light-duty applications. Most Class 8 pistons have diameters in the 4.25″ to 5.0″ range requiring a compressor sized accordingly.
Piston installation guides — typically tapered sleeves that seat in the top of the cylinder bore — guide the piston into the bore smoothly after the ring compressor has done its job. These guides prevent the ring compressor from catching the top of the bore, which can cause a ring to release before the piston is fully seated. Per PACCAR MX-13 service documentation, the use of a cylinder bore guide during piston installation is specified as a required procedure to prevent ring and liner damage.
Assembly Lubricants and Specialized Fixtures
Assembly lubricant — specifically engine assembly lube or the OEM-specified pre-lube — is applied to cylinder walls, bearing surfaces, camshaft lobes, and piston skirts before the engine sees its first drop of circulating oil. This is not the same as engine oil. Assembly lubricants are formulated to cling to metal surfaces and provide protection during the critical seconds between first cranking and when oil pressure builds. A dedicated assembly lube applicator — whether a brush or squeeze bottle — ensures even coverage without contaminating sealing surfaces.
A cylinder liner height gauge (deck bridge tool) with a dial indicator measures the protrusion of wet-sleeve liners above the block deck. This measurement is critical on engines like the Cummins ISX/X15, where incorrect liner height directly affects head gasket crush and sealing. Per Cummins X15 service procedures, liner protrusion must fall within a specified range and all liners in a set must be within a specified variation of each other — measurements that require a precision deck bridge, not estimation.
The HDJ Perspective
The HDJ Perspective
The diesel industry has seen a meaningful shift in the last decade: engines have become more precise, tolerances have tightened, and the consequences of cutting corners during a rebuild have grown more severe and more expensive. A technician who rebuilt a Cummins N14 with hand tools and shop improvisation in the 1990s faces a fundamentally different challenge on a current Cummins X15 with common-rail injection, integrated aftertreatment, and torque-to-yield fasteners throughout the top end. The rebuild tools required have evolved alongside the engines — and the shops that invest in calibrated, purpose-built tooling consistently outperform those that apply automotive-era methods to modern Class 8 powerplants. Tool investment is not overhead; it’s quality control infrastructure.
Phase 5 — First Start and Post-Rebuild Verification Tools
The rebuild isn’t complete when the engine is assembled. First start and the hours immediately following it are when component seating occurs, clearances stabilize under operating temperature, and any assembly errors make themselves known. Having the right verification tools at startup is the difference between catching a problem early and diagnosing a catastrophic failure.
Pre-Startup Checks
Before the engine cranks for the first time, prime the lubrication system. A pre-lube tool — essentially an external pump that pressurizes the oil system through the oil pressure sender port before ignition — ensures oil reaches every bearing and gallery before the engine experiences the first few revolutions. This is particularly important on a rebuilt engine where oil passages may have been cleaned and assembly lube may be the only protection on bearing surfaces during the first seconds of operation.
A coolant system pressure tester confirms head gasket integrity and checks for leaks at all connections before the engine runs under its own heat. Pressurize the cooling system to the rated cap pressure (typically 15 to 22 psi on commercial diesel cooling systems) and hold for 10 to 15 minutes while inspecting all hose connections, the water pump seal, and the coolant passages around each liner. A head gasket that passes this test cold has cleared one of the most important pre-startup validations.
Compression and Cylinder Leak-Down Testing
A dry compression test on each cylinder provides a baseline reading that can be compared against OEM minimum values for the rebuilt engine. For heavy-duty diesel engines, compression readings typically range from 350 to 500 psi depending on the engine family and compression ratio. A cylinder reading significantly below its neighbors suggests an issue with ring seating, valve seating, or head gasket integrity that must be investigated before the engine goes into service.
A cylinder leak-down tester goes further by pressurizing each cylinder with compressed air and measuring the percentage of pressure lost over time. Leak-down testing identifies exactly where compression is escaping — past the rings into the crankcase, past the exhaust valve into the exhaust manifold, or past the intake valve into the intake — giving a specific diagnostic rather than a general compression reading. 49 CFR Part 396 requires that commercial motor vehicle operators maintain records of inspection and repair — documenting your post-rebuild compression and leak-down results creates the maintenance record that supports the engine’s service history.
Post-Start Monitoring Equipment
At first start, mount a mechanical oil pressure gauge directly to the block (not relying on the dash gauge, which has its own accuracy limitations) to confirm oil pressure reaches normal operating range within a few seconds of startup. Low oil pressure at first start on a rebuilt engine demands immediate shutdown and diagnosis — running even briefly with inadequate lubrication pressure can damage newly installed bearings.
A heavy-duty scan tool connected to the engine’s SAE J1939 datalink provides real-time access to fuel rail pressure, injection timing, coolant and oil temperature, turbocharger boost, and any active or stored fault codes generated during the first-start sequence. Per the CVSA North American Standard Inspection criteria, engine condition — including smoke emissions and oil leaks — is evaluated during roadside inspections, making a properly verified and documented rebuild essential before the truck returns to service.
Free Professional Fleet Tools
Cost calculators, fault code lookup, maintenance planners, and more — built for owner-operators, fleet managers, and diesel techs. No signup required.
OEM-Specific Tooling: Where the Generic Stuff Falls Short
Every major heavy-duty diesel engine family has procedures that require tools specific to that engine’s design. Using universal or improvised alternatives on these procedures is one of the most consistent sources of callbacks, warranty claims, and failed rebuilds in the heavy-duty diesel industry.
On Cummins ISX and X15 engines, the STC (Step Timing Control) fuel system and common-rail injection components require dedicated timing fixtures and injector tools that align fuel system timing to crankshaft position within a precision range that affects both performance and emissions compliance. Per Cummins service documentation, incorrect fuel timing on the X15 directly impacts both fuel economy and aftertreatment system loading — making it both a performance and a regulatory issue. The EPA’s heavy-duty highway engine emission standards require that rebuilt engines maintain compliance with the original certification — a standard that correct fuel timing is essential to meeting.
Detroit Diesel DD13, DD15, and DD16 engines use an Amplified Common Rail (ACR) fuel system with extremely high injection pressures. The injector hold-down fixtures, timing tools, and fuel system bleeding procedures specified by Detroit Diesel service documentation are not interchangeable with generic diesel injector tools. Similarly, the DD-Platform Exhaust Gas Recirculation (EGR) system and variable geometry turbocharger require specific connection and pressure testing equipment during reassembly.
PACCAR MX-13 and MX-11 engines use a unique liner registration system for which PACCAR provides specific tooling for correct height measurement and liner seating. Per PACCAR MX-13 service documentation, liner installation without the proper height measurement fixture results in an unverified deck-to-liner relationship that cannot be confirmed any other way.
International’s A26 engine, Mack’s MP8, and Volvo’s D13 each have their own tooling requirements for timing system service, EGR component replacement, and aftertreatment interface points. The cost of renting or purchasing these tools for a complete overhaul is significant — but it is a known cost that should be included in any rebuild estimate from the outset, not an unexpected expense discovered mid-job.
Rent, Buy, or Borrow: A Smart Tool Investment Strategy
Not every diesel engine rebuild tool belongs on your permanent shelf. A clear-eyed categorization of which tools to own, which to rent, and which to access through machine shop or dealer relationships saves capital while ensuring you have the right equipment for every phase of the job.
Tools you should own outright include your core torque wrench set, micrometer set, bore gauge, dial indicator with magnetic base, feeler gauge set, seal driver set, ring compressor, and assembly lube applicators. These tools are used across virtually every engine rebuild and every engine family, and quality tools in these categories last decades with proper care. The investment pays back quickly.
Tools that make sense to rent or access through a tool rental program include engine hoists (for shops that do occasional out-of-frame work rather than making it a regular service), specialized OEM timing fixtures for a specific engine family you service infrequently, hydraulic press setups for heavy interference-fit work, and cylinder leak-down test kits with adapters for multiple engine families. Many tool suppliers offer rental programs specifically for infrequently used engine rebuild tooling.
Key Recommendation
Before committing to an in-house rebuild capability for a new engine family, price the complete OEM specialty tool kit alongside the cost of outsourcing engine-specific procedures to a dealer or machine shop. For shops rebuilding fewer than 4-6 units per year of a given engine platform, outsourcing the procedures requiring OEM fixtures is often the more economical choice. Build your in-house capability around the tools that cross engine families — measurement, torquing, and assembly tools — where the investment delivers returns across every rebuild you do.
Machine shop relationships are tools in their own right. A reliable machine shop that understands commercial diesel tolerances — not just automotive work — reduces your in-house tool requirements for block machining, crankshaft grinding, and valve seat cutting. Qualifying your machine shop before a rebuild (asking about experience with Class 8 diesel specifications, checking their measurement equipment calibration, and reviewing their documentation practices) is as important as qualifying the tools on your own shelf.
Frequently Asked Questions
What is the single most important tool for a diesel engine rebuild?
A calibrated torque wrench — ideally a full set covering 3/8″, 1/2″, and 3/4″ drive — is the most critical tool in any diesel engine rebuild. Heavy-duty diesel engines operate under compression ratios and cylinder pressures far exceeding gasoline engines, and improperly torqued head bolts, main bearing caps, or connecting rod fasteners are among the leading causes of rebuild failures. For modern engines that specify torque-plus-angle fastening (like the Cummins X15 and Detroit DD15), a torque angle gauge or digital torque wrench with angle measurement capability is equally essential. Every other precision tool supports one stage of the build; torque tools are required throughout the entire assembly process.
What is the difference between in-frame and out-of-frame diesel rebuild tool requirements?
An in-frame rebuild keeps the engine block mounted in the truck chassis, which limits the tools and access methods available. You’ll work with cylinder liner pullers, in-frame honing equipment, and portable measuring tools adapted for vertical work. An out-of-frame overhaul involves removing the complete engine and mounting it on a heavy-duty engine stand, opening up access to the crankshaft, main bearings, camshaft, and all mating surfaces. Out-of-frame work requires an engine hoist rated for 2,000+ pounds, a stand capable of supporting the engine block’s full weight, and a broader range of precision measuring instruments. In-frame rebuilds require fewer lifting tools but more specialized access equipment, while out-of-frame overhauls require more support infrastructure but provide easier access for thorough measurement and machine work.
Can I rebuild a commercial diesel engine without OEM specialty tools?
For some procedures — yes. Many teardown, measurement, and assembly tasks use universal tools that work across engine families. However, certain critical procedures on modern heavy-duty engines genuinely require OEM or OEM-equivalent specialty tools. Injector removal and installation on common-rail engines, timing system service on engines like the Detroit DD15 or Cummins X15, liner installation height measurement, and front cover seal installation often involve OEM fixtures that prevent damage to precision components. Attempting these procedures without the correct tools frequently results in damaged injector bores, incorrect timing, or coolant leaks at liner seals — failures that cost far more than renting the proper tools.
Do I need a torque angle gauge for a diesel engine rebuild?
Yes — for virtually every heavy-duty diesel engine produced in the last two decades. Manufacturers including Cummins, Detroit Diesel, PACCAR, Volvo, and International have moved to torque-to-yield or torque-plus-angle fastening specifications for head bolts, main bearing caps, and connecting rod fasteners. These specifications combine an initial torque value with additional angular rotation (typically expressed as “torque to X ft-lbs, then rotate an additional 90 degrees”) to achieve precise and repeatable clamping loads. A standard torque wrench cannot complete this specification accurately. A dedicated torque angle gauge or a digital torque wrench with integrated angle measurement is required. Using a standard torque wrench alone on angle-specified fasteners is one of the most common causes of head gasket failure in rebuilt engines.
What tools are needed to verify a diesel engine after first start?
Post-rebuild first-start verification requires pressure testing and diagnostic monitoring tools. Before the initial start, perform a cylinder leak-down test and a dry compression check on each cylinder, and pressure-test the cooling system. Once the engine is running, a mechanical oil pressure gauge (separate from the dash gauge) confirms adequate lubrication pressure at idle and operating RPM. A heavy-duty scan tool or engine data logger connected to the J1939 datalink gives you real-time access to injection timing, fuel rail pressure, coolant and oil temperatures, and any fault codes generated during initial operation. Do not rely on the truck’s instrument cluster alone during first-start verification — dedicated gauges and scan tool data provide the accuracy needed to catch problems early.
How much does a complete diesel engine rebuild tool kit cost?
A basic teardown and measurement setup — including a quality torque wrench set, bore gauge, micrometer set, feeler gauges, ring compressor, piston installation guides, and seal drivers — typically runs $1,500 to $3,500 for professional-grade tools. An engine hoist rated for 2,000+ pounds adds $600 to $1,500 depending on type and capacity. A heavy-duty engine stand suitable for Class 8 engines adds another $400 to $1,200. OEM specialty tools for a specific engine family can range from a few hundred to several thousand dollars depending on which procedures you’re performing in-house. Many shops choose to rent infrequently used specialty tools or outsource procedures requiring expensive OEM fixtures to dealers or machine shops.
A diesel engine rebuild is one of the most demanding and consequential jobs in the commercial trucking industry. The right diesel engine rebuild tools — organized by phase, selected for the engine family you’re working on, and backed by calibrated instruments at every measurement step — are the infrastructure that makes a rebuilt engine last. From the engine hoist that safely pulls a 3,000-pound block from a Class 8 frame to the torque angle gauge that correctly loads a DD15 head bolt, every tool in this guide exists to give you the accuracy and control the job demands. Invest in the right equipment, know when to rent versus buy, and build your machine shop relationships before you need them — not during a rebuild that’s already in progress.
Know a Tech Who Needs This Guide?
Share this article with your shop team or fleet maintenance crew. A technician who knows the right tools for every rebuild phase is a technician who doesn’t get called back to fix the job twice.